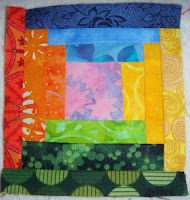
I decided to do a little paper-piecing to make something for a greeting card. This finished piece is about 3" x 3". To begin, I sketched out a mini log cabin square on tracing paper using a ruler and a thin sharpie marker.

Then I decided what colors to put in it. Of course it had to be colorful. And I found a great way to use up some of my scrap mound.

Ever wonder what to do with some of those weird-shaped scraps? A mini paper-piecing project is a great idea! I chose to use yellow on one side of the middle square, blue on another, orange on another and green on the last.

I chose this pink piece for #1. If you've never taken a paper-piecing class, there are a lot of great books and it is worthwhile to sign up for a basic paper-piecing course at the local quilt shop, or have someone show you. The first time I ever did it, I was overwhelmed by how counter-intuitive it seemed. And even now, after doing it so many times, I still feel a little weird the whole time I'm making a piece, like I'm a little confused and things are reverse, but as soon as I finish the piece I breathe a sigh of relief. Besides, if you mess up and cut the wrong thing or use too small a piece of fabric, just start over. It's like with the beans disaster I had a month ago. I couldn't figure out what to do to fix the mess. Finally, after consulting with my mom about possible recipes, she suggested I throw them out and start over, since they were only 50 cents to begin with. It was funny how that was possibly the simplest idea but it never occured to me! And yes, I felt wasteful, but let's be honest, they really weren't salvagable in the first place.

Place the first fabric over the middle square, ensuring the right side of the fabric is facing UP. And the fabric covers all of the lines surrounding #1.

Place the fabric for #2 over the #1 fabric, right side DOWN, and consider what is going to happen with this fabric. You are going to sew along the line between #1 and #2, so when you open and press the yellow fabric, what you have needs to cover all the lines around #2 entirely, so the scrap needs to be big enough. This is a mini square so you can use little scraps but the bigger the pieces the bigger the scraps need to be. Notice here the tracing paper is facing up.

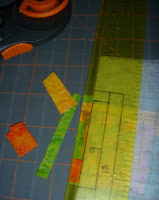
Now turn the paper over, ensuring the fabric stays in the same place. Some people pin it but I don't have the patience. I've never had a problem with just holding it and placing it upside down on the machine, and if the fabric shifts, just turn it over and adjust it! Sew along the line between #1 and #2. Position the needle a few millimeters before the line and sew a few millimeters past the line on the other side. Look closely at this next picture to see what I mean:

Then, clip the threads and turn the thing over and press the yellow piece open.

This is what the sewn, pressed piece looks like with #1 and #2 sewn together.

Here is the next tricky part where I definitely learned the hard way. Turn the paper back over. You need to crease the paper along the next line out, which in the case of this log cabin piece is parallel to the line you just sewed. That is not true (the parallel-ness) for every kind of paper-piecing (for example, if you're doing Karen Stone's New York Beauty). In this case, the next line happens to be parallel to the line you just sewed. Crease that line.


The majority of the piece will be face-down except the flap of paper you creased. The excess fabric from #2 will be showing (yellow, here).
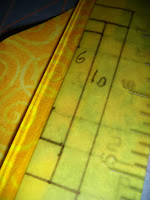
Using an 'add-a-quarter' ruler, place the edge of the ruler over the edge of the crease.

Trim using a rotary cutter.

This is how the trimmed piece looks.

Turn it back over and see how the pressed, trimmed piece looks.

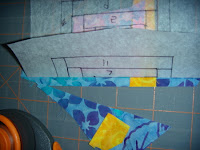
Now for #3. Place fabric #3 on the piece so it will entirely cover all the lines around #3 (meaning the four lines that comprise #3) AFTER it is sewn and pressed open. This takes a little thinking sometimes, especially if you are working with weird-shaped scraps. Play around with it and get a different scrap if the one you chose isn't big enough.

Turn it over and sew along the entire line that connects #1 and #3, remembering to start a little bit before the line and sew until just after the line that comprises #1 (see below).

This is how the line should look after being sewn:

Again, clip the threads, turn over, press the blue piece open, then turn over and crease along the next line out from the one you sewed.

This is how it looks after being trimmed using the add-a-quarter-inch ruler and a rotary cutter.
Turn it back over and this is how the piece looks with #1, #2, and #3 sewn, pressed, and trimmed.

If you get confused about what comes next because all that fabric is hiding the lines from the top, turn the piece over and look at your stitching. See what number you just stitched along. In the picture below, you can see stitching along #3, so you know #4 comes next. Again, this is in the case of this orderly log cabin piece. Once you become familiar with the concept of paper-piecing, you'll quickly and easily be able to design almost anything you want to be paper-pieced, and figure out the best order to sew the pieces.

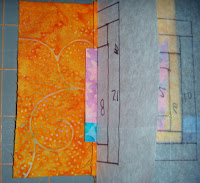
#4 is an orange piece. The scrap I had selected was too small to cover the whole segment when opened, so I went back to the scrap pile and found a larger orange. I love this fabric, it is one of my favorites.

Another picture of sewing along the line #4, starting a little before the line that is creased and ending a little after the line that comprises #1.


Here is how the line looks when sewn:

And after pressing the orange piece open, creasing the paper, and preparing it to be trimmed using the add-a-quarter ruler:
Trimming:

How the piece looks with #1, #2, #3, and #4 sewn, pressed, and trimmed:

And checking the underside to see what comes next: #5.

A green piece for #5:

Sewing along line 5:

Starting a little before the line begins:

How the sewn line looks:

Pressing the piece with #5:

Trimming:
Now I've gone around the entire middle piece one time. So I continue with another yellow, #6, following the same techniques as described above: 1-use a large enough piece of fabric 2- sew along the line; 3-clip threads and press segment open with an iron (some people finger-press, but I like to iron); 4-trim using an add-a-quarter ruler and a rotary cutter; 5-do the next segment.

This is how the piece looks after all segments are sewn:

And from the back:

Now I cut around the paper. I made this square to put into a card, so I didn't plan for a seam allowance. But if you're going to make, let's say, 100 of these babies for a wall hanging, then you would simply draw dashed lines around the outside lines, 1/4" away from the solid line, and cut along the dashed line, THEN remove the paper backing.

And now, tear away the tracing paper backing.

I use a seam ripper or a pin to get at the difficult areas, being careful not to snag the fabric.


This is how the back looks after all the paper has been removed.

And the front.

That is a quick and easy project and now I can use the piece to make a greeting card!
 This morning I made the cheetah bag (finally) for my sister's kids. It was a lot of fun and I love the final result! (I might have to make myself one!) I used the cheetah fabric I bought a few months ago, and I used some cool animal print fabric I got during my shop hop in Phoenix last week. The selvage did not say the name of the fabric (I only got 1/4 yard and the name was cut off). I used a black canvas-type fabric for the bottom for durability and also for the inside. I used fusible fleece again for stability, both on the inside bag and the outside bag. I made this the same way I made Sophia's bag, but I wanted a slightly bigger bag here so I started with a 15.5" x 29" piece of fabric. I also added a small bit of velcro on the inside of this bag to hold it shut when in use:
 Isn't this fabric cool!
 Now I'm off to make a pie! Happy Thanksgiving!


