Friday, August 29, 2008

Baby Quilt for Denise

Tonight I finished the baby quilt for Denise. She wanted pink, orange, purple and yellow. My favorite part of this quilt is the quilting detail I did in the little square pieces inside the squares:
I followed the motifs of the fabrics for most of the quilting which helped me practice some new 'moves.' There is one fabric with a lot of swooping 'leaf'-like motifs and another with circles that I played with. I see, as with all things, the more I practice at free-motion the better I am getting, and the easier it is to come up with fun designs on the fly.

Friday, August 22, 2008

UFOs

Started in 2008, blues and oranges made from half-square triangles, based on a quilt I saw in APQ magazine:
"Charmed" - a bunch (1000's) of 60 degree triangles. In 2006, I cut all the triangles (no three are alike - ie, I cut two triangles from each fabric). I put it all on a design wall, then removed each row and packaged for sewing. This is larger than a king, and it is still sitting in the bag, fermenting for the day it is completed and enjoyed.
From the Indian Orange Peel class I took, I made many of the arcs but was unable to attend the last several sessions of the class, so I remain intimidated to complete the top (especially the border which is a daunting, seemingly impossible task in itself - much like a 10,000 piece jigsaw puzzle, only this quilt's border requires perfect attention to detail). Began in 2006:
I thought of another, 'easier' way to arrange the arcs. Could also be pretty:

Baby Quilts 2007-2008

For Tiffany's baby, 2007:
Adam and Laura's baby, 2007:
Adam and Laura's other baby (twins), 2007:

Dave and Amy's baby, 2008:
Sophia, 2008 (for her 3rd bday), larger than a baby quilt, more like a small twin:
All these quilts were machine-pieced and machine quilted on my Bernina.

Wall Hangings 2006-2007

In September 2006, I attended the Quilter's Unlimited show in Dulles, VA, and saw some really delicate and beautiful flowers cut from fabric adhered to a wall hanging in one of the booths. The vendor told me the quilt was made by McKenna Ryan, and encouraged me to sign up for a class later that day - I did sign up. The project was a really goofy fish, and not the intricate flowers I so wanted to learn how to make. Nevertheless, I learned about fusible web and how to use it, and I started making wall hangings after that. The class opened my eyes to a new technique and I, having always abhored traditional needle-turn hand applique (having attempted to learn it from a woman who taught me Hawaiian applique), now felt free to put imagination to fabric and let loose my design and creativity muses. The wall-hanging above was made for Rachel, who loves sunflowers. It was my first attempt using fusible web. I also used my then-new Bernina to embroider-stitch around the edges of the fused fabric pieces.

This was my second wall-hanging using fusible web. I entered it into an exhibit at the Rocky Mountain Quilt Museum where it hung for a few weeks. How exciting! (2007: The Mentor) This wall-hanging (2007: A Bird's Paradise) used fusible web as well as paper-piecing (the sun, the curving 'birds' and the triangle fish below):I had learned paper-piecing first at a beginners class at the Quilted Apple in Phoenix in 2005, then at the Cotton Patch in Lafayette, CA in 2006, where I took Karen K. Stone's Indian Orange Peel class taught by Vicki Wind; and finally, I took another paper-piecing class, Judy Niemeyer's Raindrops at the Quilt Patch in Fairfax, VA in 2006.
Wall-hanging made in 2007 - The Old Tree and the Wall, Longtime Friends in Granada:

More Quilts: 2004-2006

In October 2005, I saw a quilt hanging in a quilt shop that had strips and squares and my mind formed this version (above) with lights and darks alternating. I had it long-arm quilted with a pretty variagated thread. This quilt is a little larger than a queen. It is one of my favorites. Later I found the pattern for the quilt I had seen hanging: Allegro, by Atkinson Designs.

I made this baby quilt in late 2006. It was my first attempt at machine quilting:
This quilt was made based on an article in American Patchwork and Quilting magazine in 2006, called 'Kids in a Candy Store.' I have tried unsuccessfully to locate the article or pattern for a useful link. I think it is beautiful. The white is a white-on-white with pretty dots that form bubbles. Aren't the bright colors fabulous:
This quilt was made in 2005 and early 2006 from Linda Ballard's Peppermint & Sassafrass, which introduced me to several new techniques, including half-triangle squares, and popping seams.

This was a baby quilt made in 2004. At the time I was still tie-ing quilts
One of my first wall-hangings. This was done for a Value Recognition exercise from Gai Perry's book 'Color From the Heart; in January 2006:
This was a small quilt in 2005: My second wall-hanging, made in early 2006. I had seen a quilt made entirely of these Flying Geese blocks in a quilt shop.
This little doll quilt was made in 2006. It is tiny but I love the colors. I placed pieces on top of one another and stitched on top of it all, using stabilizer, which I removed before quilting.

More Quilts: 1998 and 1999

I made this Sawtooth Star in 1998 and 1999. I recall this being the first quilt where I actually pressed the seams. I finished off the edges (before quilting it) and handquilted it. There are 100 stars but I only finished quilting 70 of the stars, so technically it is still unfinished. It is much prettier and more colorful in real life.

This Bear's Paw was made (the top, anyway) in 1999. A friend wanted a quilt so I helped him make it. He chose this pattern and the colors. I designed the quilt and made an error in calculation (forgetting the squares are on point) - resulting in a finished King top instead of the ~Full we thought we had planned. He sewed and I ironed seams. It is a lovely quilt. I hope it did not fall apart since it was sewn with a super-old Kenmore - the machine only sewed about 10 stitches per inch.

Solid Geometric Quilts, 1997-1999

This type of quilt was my style in college - solid colors, which my small stash at the time consisted entirely of. Friends would find out I made quilts and they would want one, so this is what I churned out. I loved solid, bright, bold colors and loved the lines created by combining bright solids against dark solids. I made at least 10 to 15 of these quilts in college.

More Quilts: 1997 and 1998

This was my first baby quilt. I made it with pastel solids, using the 'broken dishes' pattern, in 1997 or 1998.
My sister has been into the Civil War for many years. I copied some passages out of a book she had, along with photos of her favorite generals, and transferred them to fabric. Then I pieced together (a hodge-podge, really) all the different elements.

This quilt was made in ~1997 or 1998 based on a specific design someone wanted.
I did not use accurate seam allowances, nor did I ever press any seams back then. So sometimes the finished result was somewhat an atrocity. Piecing of rows always resulted in puckers, sometimes one or two inches long (horrors!!!). But I sewed right through them and didn't seem to think it was a big deal. (I do know better now.)

Here is another quilt, the layout and fabrics were picked by someone else.

More Quilts - 1996 and 1997

This was the second quilt I made. I used a white outer border (really, a sheet turned to the front). This quilt (below) is a variation on the trip-around-the-world blue/black/white theme. This was my third quilt.
This is a red-white-blue fence rail (below). I used exclusively solid colors in all my first quilts (apart from the very first quilt). Solid colors and geometric patterns was my style for my first ~10 years of quilting. A better view of this quilt is on the previous post, it is the quilt in the lower right. I still have this quilt but I have also made several more 'editions' of this same quilt over the years.
I made this Drunkard's Path sometime in 1997. I didn't buy enough red fabric the first time around so I returned to the store to buy more and that is how I first learned the concept of dye lots - the dye lot didn't match so if you look closely you can see the reds aren't all the same 'color.' At the time I was devastated (as devastated as a person can be about incompatible dye lots) but now I really don't care about that kind of thing. Unless you're using black. Then incompatible dye lots can really be a problem. Unless you make it look like you did it on purpose, then it's fine.
The Drunkard's Path was the first quilt I hand-quilted. Also, I machine-pieced the squares after hand-piecing a few and realizing I could quite easily machine-piece curves (though I have never really enjoyed, per se, piecing curves. However, I used white thread, which you can see at the seams on the quilt in some places. Hey, it was all a learning experience. That was what my machine was threaded with, and I never thought twice about it. Now I used a neutral beige color thread for almost everything.

Monday, August 11, 2008

Quilts - a beginning

I'm going to post photos for all the quilts I've made that I can manage to find photos of, starting chronologically backwards and working my way forward in time to the present.

I got into quilting in 1995. The first quilt I ever made is seen in the lower left-hand corner of this photo: It was a simple quilt made with a bunch of colorful squares and two different fabrics for the inner border, then the back was a sheet that was turned to the front for the outer border/'binding'. The quilt was tied. That was how I made all of my quilts (with a few exceptions that were handquilted) for the first ~10 years of my quilting life. My mom showed me how to operate the sewing machine. The other quilts in this photo were made later, in 1996 and 1997.

Sunday, August 10, 2008

Pink Lemonade for Sophia

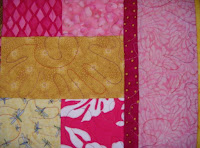
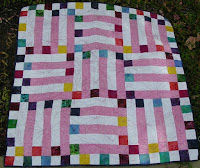
I did it! I finished the binding (always my dread). This pink and yellow quilt (affectionately titled 'Pink Lemonade' is for Sophia. She turns 3 this week, so the 56"x71" size should be sufficient for her to use as a makeshift tent, a princess robe, an outdoor magic carpet, or simply a blanket for the bed. I love the dark pink and yellow dot print that is the inner border. I free-motion quilted it on the machine using the Bernina Stitch Regulator:
The back is a hodge podge of batiks. You should have seen me trying to sew them all together - I am pleased it actually came out flat. The yellow stripe was coincidental - I just needed a bit of fabric to make the pink piece longer - but it seems to go well with the yellow binding. My favorite section of the bright yellow binding is the fabric from Jan Mullenz Stargazey collection - I say, there should be a reprint of that entire collection. I notice bits and pieces from that line in various quilts I see at shows, and I am thrown into a nostalgia from ten years ago when I was really getting into quilting and that line came out.
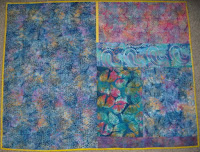
But the real reason I used these blue batiks was the following phone conversation I had with Sophia a month ago: me "Sophia, I'm making you a pink and yellow quilt." Sophia "But I don't LIKE Lellow, I like blue!" Then Sarah got on the phone while telling Sophia in the background, "You like ALL the colors." Sarah said Sophia's favorite color has been black, gold, pink, blue, etc.. and she expects it to be something different every day. (Back when I first thought about making her a quilt, her self-professed favorite colors were pink and yellow - that was back when I made her that doll with the huge skirts and the scary-looking, poorly drawn face.) So now Sophia can happily use either side of the quilt.

Meanwhile, I was going to tell you how to make this quilt. It's very simple really. Pick two (or more, whatever you like) colors, and cut 48 total pieces the following size: 9"x4.5". (I chose 9" because a lot of my fabrics are long quarters so the cut comes perfectly off the end of one of those). I did 24 pieces from yellows (lights, mediums and darks) and 24 from pinks (lights to darks). Then sew one pink to one yellow, for a total of 24 blocks, now measuring 9"x8.5". Then whack those in half after pressing, giving you 48 'bricks' (with two squares per brick) that measure 4.5"x8.5". Then, cut 48 pieces from your stash measuring 4.5"x8.5". These are long bricks with only one piece. Next, sew one long brick to one 2-square brick. Do that 48 times. You'll have 48 blocks. Then lay out the blocks on the floor, 6 blocks by 8 blocks, until you get something pleasing, then sew the blocks together in rows, then sew the rows together, then add borders and quilt and bind. Enjoy!
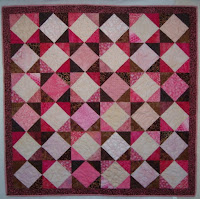
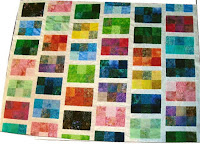
Friday, August 8, 2008

New York Subway Tiles

I was fascinated by the artwork in the Manhattan underground. The walls of the subway stations are loaded with various mosaics. Everywhere you look is design inspiration!
Wikipedia has a good article about the Subway art.